My war on leaks.
When I first inspected Pelago I noticed that there was some damage to bulkheads and cabinetry due to leaks. It took a little while to determine the causes of the leaks and it turned out to be a little bit of everything: hatches, ports, and hardware mounted to the deck. But by far the most insidious were the leaks along the hull-deck joint.
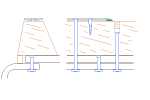
| The Columbia 33 and the Columbia 40 were initially billed as the "Flagship Models. As such, they were well put together boats and the hull deck joint was designed to last. On the Columbia 40 the hull comes up and curves inward to create a flange. The deck rests on the flange and the two are thru bolted together. As if that wasn't enough, Columbia added a small hardwood forest's worth of teak toe rails and thru bolted them to the boat through the hull-deck joint. Finally, they added a traveler track to about the last third of the toe rail and many of the fastening bolts go through the hull-deck joint. |
 | Hull-deck joint showing bolts holding the deck, toerail, and traveler track to the hull. Some traveler fasteners are wood screws. |
| Columbia put a liberal amount of caulk between the hull and deck during assembly. They used a good quality caulk, but that was 35 years ago. It has long since hardened and leaks have developed between the hull and deck and inevitably down past some of the multitude of 1/4 inch bolts that hold everything together. Sealing this is a process that is not for the faint of heart, but leaks will eventually destroy the boat. |
| During the winter of 2000-2001 I made my first attempt to seal the hull-deck joint. Mark Cole (Echo, hull 54) sealed his boat by loosening all the nuts on the bolts in the hull-deck joint, driving wooden wedges into the joint, and pumping 5200 in between the hull and deck. It worked for him and it sounded like a good plan, so I decided to try it. I laid in a supply of 5200 and commenced to loosen the nuts. There are a lot of nuts. I could reach the heads of some screws on the toerails and traveler tracks, but most screws were buried. I came up with a few techniques for getting the nuts loose on the hidden screws. |
| Just after I got everything ready, Mark came to town for a weekend and I managed to enlist his help to recaulk the joint. It took most of a day, but we got it done. I came back the next day and snugged up the nuts a little. |
| Then I waited for the next good rain. The good news is that all the places that Mark worked on were dry. Some spots I worked on leaked. These were mostly inside cabinets where it was hard to pump the caulk in. I put the boat in the water and went sailing. |
| I was pretty disgusted that the previous year's repairs didn't completely work, but I wasn't ready to give up. I could think of only two options. The first was to remove the deck, clean out the joint and reassemble the boat. That was a bit much. The second was to remove the toe rails, glass over the hull-deck joint, and reinstall the toe rails and travelers using liberal amounts of fresh caulk at the bolt holes. This was more realistic and it gave me the opportunity to refinish the toerails while they were off the boat. I started removing the toe rails all the way around the boat. First I had to remove the traveler tracks, which are about as long as the house. Then I removed the toerails. They are massive pieces of wood. I figure that somewhere in the South Pacific there is an island with no teak trees on it over 35 years old. There are four sections of toe rail on each side and two very short sections across the top of the transom. It takes one person inside and one outside to move the job along. Some nuts for the toe rail and traveler track are almost on top of hull-deck joint nuts and others butt up against bulkheads, so it's best to have a deep socket, a combination open/box wrench, and vice grips inside to hold the nuts. Outside a large screwdriver is needed to hold stubborn screws and a cordless drill is necessary to remove the 3"-5" long screws. |
| We scrapped off the old caulk, which wasn't terribly difficult. Once the caulk was removed, I commenced grinding with a belt sander. Grinding was time consuming and a bit messy. Make sure you close all the hatches BEFORE you start grinding. As I ground into the deck and hull, I found that under the layer of white gelcoat was a layer of black resin. I think the purpose of the black layer is to keep light from penetrating the hull and deck. Once this layer was removed a lot of light showed through the hull. |
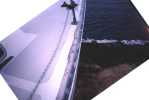
 | The picture shows the deck ground down to bare fiberglass and the hull ground to the black layer. |
| Once the sanding was done the glassing could begin. The first step was to mix a putty of resin and cabosil and make a filet in the corner where the hull and deck meet. There were two reasons for the filet. The first was to make certain the hull-deck joint was sealed. The second was to form a smooth curve for the fiberglass to lay on. The next step was to lay some fiberglass tape along the joint. The tape would help stabilize the joint to prevent cracks from forming at the joint. It also wrapped over the top of the deck and covered the screws holding the hull to the deck. We used three inch and four inch tape depending on how much room there was to work with. |
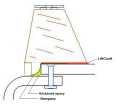
 | This diagram shows the thickened epoxy filet (yellow), the fiberglass (green), and the caulk put under the toe rail (red). |
| The whole glassing process went pretty easily. It only took a couple hours. Jackie and I each applied half of the thickened epoxy. Fitz dropped by about then. Jackie cut the tape and Fitz and I applied it. |
 | The hull-deck joint is finally glassed. |
| After all the disassembly and prep, the hull-deck joint was finally sealed. But that's only the first part of the battle. |
 | The glassing done, Fitz rests. |
| The next step was to put some paint on the deck. If I had known how long it would be before Pelago would splash, I might have tried to paint the whole deck. As it was, I only painted over the fiberglass and out to the edge of the non-skid. |
 | The hull-deck joint painted. |
| Some would think that sealing the hull-deck joint would be enough for one Spring, but there are always plenty of other little projects. Here Jackie touches up the bottom paint. A couple guys walked by while she was painting and got quite a laugh at the little roller and the big boat. |
 | Jackie, the artist. |
| In between working on the hull-deck joint, I had to refinish the toe rails. This included sanding off the remains of the old finish and gluing in pieces of teak where the rails had been damaged. |
 | The toe rails in my back yard. You can see one rail waiting for sanding, another completely sanded, and clamping/gluing pieces of wood in place. |
| Finally the toe rails went back on. It took a little courage to drill through the fiberglass I had just put on to seal the joint, but I had no other option. I started the process by drilling through a couple original holes and putting a couple bolts through the rail and deck. Then I could start fitting the toe rails back in place. Interestingly, some rails maintained the bend they had when installed. Others required bending to fit. This was a tedious process because I had to drill all the holes and install bolts to keep the rail lined up and then I had to remove the rails again so I could caulk under them. I laid a bead of caulk under the inboard edge of the toe rail. The idea is to keep water on the deck from getting under the toe rail. I didn't caulk under the lower outboard edge because I assumed water would get under the rails and I wanted it to be able to drain out. I also caulked liberally around the bolt holes I had just drilled. |
 | The toe rails installed. |
| Once the toe rails were on we had to install the traveler tracks. First I tacked down the wood strip that spaced the flat traveler track off the toe rail, and then we started drilling more holes and installing the bolts. We pumped caulk in from below whenever possible, so we would know it sealed the hole. So how did we do? So far I've found no sign of leakage, but only time will tell. |
Eric White, Spring 2002